Dreaming of a stunning new bathroom floor or a modern kitchen backsplash? Porcelain tile offers the perfect blend of timeless elegance, durability, and functionality to elevate any space.
But what if you could achieve this dream transformation without breaking the bank or hiring a professional? The good news is, that installing porcelain tile yourself can be a rewarding and cost-effective way to personalize your home.
This comprehensive guide equips you with the knowledge and confidence to tackle a porcelain tile installation project like a pro, even if you’re a complete DIY beginner.
Planning To Install Porcelain Tile
Before diving headfirst into grouting and laying tiles, meticulous planning is key to a successful and stress-free installation. Here’s what you need to consider:
Gather Your Supplies
- Essential Tools: Assemble the necessary tools for your project. This might include a tape measure, level, trowel, tile cutter, safety glasses, gloves, bucket, grout float, sponges, and a damp cloth.
- Choosing the Right Tile: Selecting the perfect porcelain tile is crucial. Consider factors such as size (think square footage of your project), thickness (depending on foot traffic and subfloor), and finish (glazed, matte, textured).
Explore a variety of options and styles from a reputable tiles exporter to find the perfect match for your vision.
By meticulously planning your porcelain tile installation, you can ensure a professional-looking finish and minimize wasted materials.
Selecting the Perfect Tile
When choosing your porcelain tile, keep these factors in mind:
- Size: Measure the space you plan to tile to determine the appropriate tile size. Consider larger format tiles for a more modern and expansive look or smaller mosaic tiles for intricate designs.
- Thickness: Opt for thicker tiles (usually 8mm or more) for high-traffic areas like kitchens and bathrooms. Thinner tiles (around 5mm) are suitable for low-traffic walls or areas with existing flooring.
- Finish: Explore a variety of finishes to suit your desired aesthetic. Glazed tiles offer a classic, glossy look, while matte finishes provide a more contemporary and textured feel.
Prepare the Subfloor
A flawless porcelain tile installation starts with a clean, level, and stable subfloor. Here’s how to get your subfloor prepped:
- Inspection: Begin by thoroughly inspecting the subfloor for any cracks, unevenness, or loose tiles (if applicable).
- Cleaning: Sweep, vacuum, and remove any debris or dirt from the subfloor to ensure proper adhesion of the mortar.
- Leveling: Use a level to identify any uneven areas. Address minor inconsistencies with patching compound and for significant repairs, consult a professional.
- Addressing Damage: If you discover cracks, loose tiles, or other damage, ensure proper repairs are made before proceeding with the installation.
Plan Your Tile Layout
Planning your tile layout is essential for minimizing wasted materials and achieving a visually appealing final product. Here are some tips:
- Layout Options: Explore different layout patterns to find the one that best suits your space. Popular options include straight set (parallel rows), diagonal (creating a diamond pattern), or running bond (overlapping rows).
- Minimize Waste: To minimize tile waste, consider starting your layout from the center of the room and working your way outwards.
- Dry Run: Before applying mortar, perform a “dry run” by placing the tiles on the subfloor according to your chosen layout. This helps visualize the final look and identify any adjustments needed.
By meticulously planning your porcelain tile installation, you can ensure a professional-looking finish and minimize wasted materials.
Installing Porcelain Tile
Now that you’ve meticulously planned and prepped, it’s time for the exciting part – laying the porcelain tile.
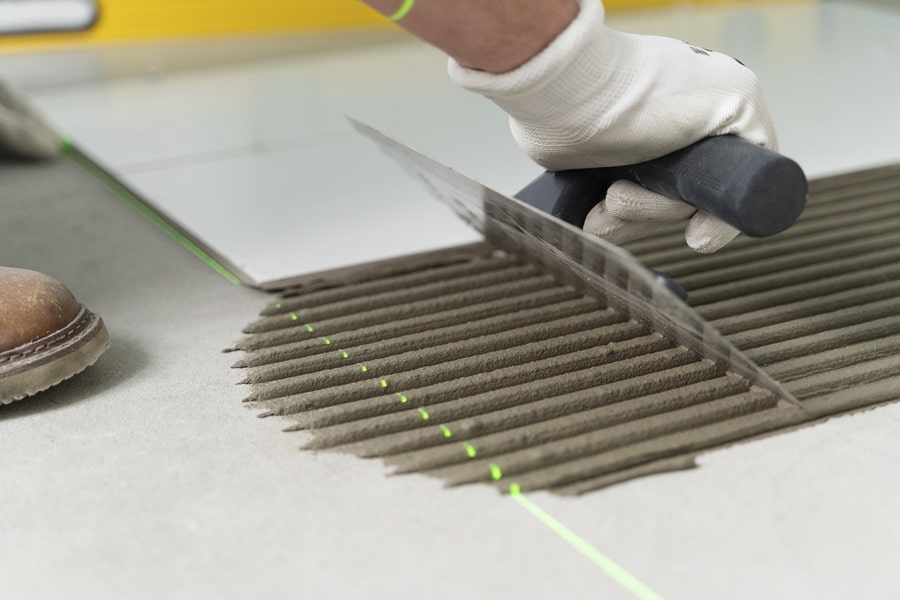
Applying Mortar
- Mixing Mortar: Follow the manufacturer’s instructions for mixing the thin-set mortar. Ensure you achieve a smooth, consistent consistency, typically resembling peanut butter.
- Applying Mortar: Using a notched trowel, spread the mortar onto a manageable section of the subfloor. Maintain a consistent thickness as recommended by the mortar manufacturer (usually around 1/8 inch).
Applying a consistent layer of mortar is crucial for a strong and even porcelain tile installation.
Laying the Tile
Now comes the moment of truth – carefully placing the porcelain tiles onto the mortared subfloor:
- Following the Layout: Work according to your planned layout, ensuring each tile aligns seamlessly with its neighbors.
- Using Spacers: Insert tile spacers between each tile to maintain consistent grout lines throughout the installation.
- Maintaining Level: Continuously use a level to ensure each tile sits perfectly flat. Gently tap the tiles with a rubber mallet to adjust their position if needed.
Cutting Porcelain Tile
While most tiles may fit perfectly, some areas might require cutting to fit around fixtures or create intricate designs. Here’s where the tile cutter comes in:
- Safety First: Always wear safety glasses and gloves when operating the tile cutter to avoid injuries.
- Using the Tile Cutter: Follow the manufacturer’s instructions for your specific tile cutter model. Score and snap the tile along the desired cutting line. Practice on scrap tiles before attempting cuts on your main tiles.
Mastering the art of cutting porcelain tile allows for a seamless porcelain tile installation, especially around fixtures or for creating unique designs.
Completing Your Project
You’re almost there! Here’s how to finalize your porcelain tile installation project:
Grouting the Tile
Grout fills the gaps between the installed porcelain tiles, creating a finished and polished look. Here’s how to handle the grouting process:
- Mixing Grout: Following the manufacturer’s instructions, mix the grout to a smooth, slightly wet consistency.
- Applying Grout: Using a grout float, diagonally press the grout across the tiles, filling all the gaps.
- Removing Excess Grout: After allowing the grout to set slightly (refer to manufacturer’s recommendations), use a damp sponge diagonally across the tiles to remove excess grout. Rinse the sponge frequently to prevent the spreading of residue.
Cleaning and Sealing
Once the grout has cured (usually 24-48 hours), it’s time for cleaning and sealing:
- Cleaning: Using a clean, damp cloth, remove any remaining grout haze from the tile surface.
- Sealing: Applying a grout sealer creates a protective barrier, enhancing stain resistance and making future cleaning easier. Choose a sealer appropriate for your specific grout and follow the application instructions.
Letting Your Project Cure
Patience is key! Allow the install porcelain tile project to cure completely before using the area. The recommended curing time will vary depending on the specific mortar and grout used, so refer to the manufacturer’s instructions.
- Patience is key! Allow the installed porcelain tile project to cure completely for a strong and durable finish.
Conclusion
Congratulations! You’ve completed your very own porcelain tile installation project. Take a moment to admire your accomplishments and the beautiful new transformation in your space.
Installing porcelain tile yourself not only saves money but also provides a sense of immense satisfaction and the knowledge that you can tackle DIY projects with confidence. So, embrace your inner DIYer and embark on your next home improvement adventure.